 Last year I organized a project where we gutted an ’80s era arcade cabinet and filled it full of indie games. Jph Wacheski, the chief retrofitter, wrote the article below for people wanting to do the same in the most recent Broken Pencil.
Lots of people are making their own games these days — point-and-click tools like Scratch and GameMaker are making it more accessible for non-programmers, and it’s easy to get your game out there via the internet. But wouldn’t it be even cooler to get you and your friends’ games out there on an old-school arcade cabinet?
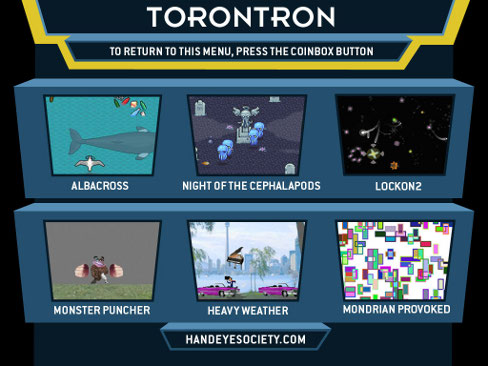
The old cabinets are generally made to play one specific game, but you can re-fit it with a PC and a display and wire up the existing controls to make playing new games possible. Many people have been doing this to run emulators of the classic games — MAME cabinets can run hundreds of old games on a single cabinet. The Hand Eye Society, Toronto’s videogame culture collective, wanted to do a similar thing, but with locally made games. They debuted the Torontron, which plays six hand-crafted games by Toronto indies, at the last Canzine. Jph, who did the retrofitting, takes us through the steps he took.
Step One: The Cabinet – Retrofit or built from scratch?
First I began looking for an old cabinet that we could stuff all the gear into. In Oakville, Ontario we found The Original Pinball Exchange Club, offering various scrapped amusement vending machines for sale. I visited the shop and chatted with the proprietors. Walking through their stores of machines – and machine parts — I was amazed, and was fully inspired.
The hardware we got was old and unique — it originally played an Italian clone of Centipede. It worked for our purposes because it was not recognizable as any specific machine shape and the graphics printed on it were also generic enough that we would not need to change them. The down side of getting a machine that was built in 1982 is that it is almost 30 years old, and though the build quality was reasonably good, some parts of it where quite worn and broken. If I were to do this again I would consider just building the box myself since the reconstruction needed inside to make sure it held the display properly was extensive. However there is something nice about the nostalgic old machines as well. If you plan to use a retro cabinet be sure to measure your display and check that it will indeed fit in the box. This will greatly depend on the orientation of the display and where it will sit in the box.
I got a cabinet with simple controls — one joystick and buttons — but you can get cabinets with more elaborate or specialized control schemes. If you plan to use the original controls (as opposed to buying new controls) then make sure the games you plan to run on them just need those controls to play.

Step Two: The CPU – Find a computer someone’s throwing out.
I used a laptop that was being thrown away, but any old PC will do, as long as it will run the games you intend to play on your machine. Our machine is intended to travel so the ruggedized nature of a laptop was desirable. If you intend to keep your machine in the basement/garage for your own use then a standard desktop PC will work just fine.
Step Three: The Display – CRT or LCD?
Next we need a nice display. The tube-style CRTs are easy to find these days on garbage day as people upgrade to flatter LCDs , but you have to take care in mounting them within the cabinets — they’re heavy. (Seventeen inch screens are very common but look a bit small in a full sized cabinet.) I went with an even heavier option, an old 21″ Trinatron TV with an S-video in that I connected directly to the laptop. Although this would limit us to 1024×768 resolution, and it’s a bit blurry at that, it does provide a proper, large and bright image that is more authentically “arcade”. But the weight and fragility of the old TV has made moving it difficult when we don’t have a vehicle big enough for it to stand up in — setting it on its back has caused the TV to come loose in the past. So it’s a trade off.
Step Four: The Controls – Buy a kit or rewire the original controls?
Since I wanted to use the original controls that came with the cabinet, I got a USB controller, opened it up and then soldered the outputs of the original controls to the corresponding buttons on the USB controller. You could also consider purchasing all new controls since two new sticks and 20+ buttons runs around $40. Then you could replace the original controls and plug them directly into your CPU via a USB gamepad interface for another $40. $80 would have saved me many headaches indeed.
Step Five: The Mounting – Securing the display, CPU and speakers.
By reworking the old monitor mounts – the wood planks that held it at the right height and angle — and adding some new bracing to work with the oddly shaped and situated TV, the TV was mounted inside. Adding the TV monitor had the added benefit of making the whole box more solid. The TV speakers, which we removed from the TV, were mounted where the original single speaker was in the cabinet and wired in, giving us some nice stereo sound. If the display does not have sound, a pair of computer speakers could also do the job.
The old marquee light did not work and was replaced with a simple under counter florescent fixture and was wired in. The laptop fit in the coin box area, and everything was plugged into a single power bar mounted near the back of the box.
Step Six: The Interface – How to launch the games?
Windows XP was what we used as an operating system, but anything that runs on your hardware and the game(s) you want to play would work. I used GameMaker to build a menu that lets the player select and launch between the six games. The menu keeps running, and when a game is exited, goes back to the main menu so the player can select another game. We used six games in the Torontron and we had all the game creators make a version of their game that conformed to our control requirements, such as quitting when the red button on the coin box was pressed.
Step Seven: The Glory – Is there anything cooler?
As with any hardware/software proposition, there’s a lot of work and a lot of testing required to get it looking and acting like an arcade machine of olde. We had particular trouble with the controls which are inclined to be glitchy. But once you get it working right, it’ll inspire spontaneous high-fives and many exclamations of “awesome!”
~~~
Jph Wacheski and the Hand Eye Society are hard at work making five more arcade cabinets to be presented as an indie arcade at the TIFF Bell Lightbox for Nuit Blanche 2010 on October 2. Want to help out with the Arcadian Renaissance event? Drop them a line at info@handeyesociety.com.
Got any questions? Additions? Suggestions? Add them in the comments below.
6 responses to “Build Your Own Indie Arcade Cabinet”
A couple of things…
One, I know another couple of excellent sources for empty cabinets:
– http://www.cgcc.ca, the Classic Game Collectors of Canada (or somesuch, I forget what the letters actually stand for) has a great forum for collectors. Go to the coin-op page and see if anyone’s got one for sale or to give away. Or post your request and see if anyone has what you need.
– The Playdium Store near Kipling and the 401 has auctions every six weeks or so. I’ve picked up full-working games there for $50 and $75. You can pick up a non-working cabinet really cheap sometimes.
Two, I played Monster Puncher and Heavy Weather for about 15 minutes during the comic arts show a few months ago. That machine kicks serious ass. If it had a coin slot I would’ve gladly paid to play!
very missing is a kind of Torontron-Linux , 100% software libre – for when can we expect this?
This is pretty neat! I’m interested in building my own cocktail arcade table. Do you have any tips?
Check out the Dirty Rectangles (Ottawa game culture crew) teardown vid of theirs: http://www.dirty-rectangles.com/?p=350
[…] Torontron cabinets were engineered by Jph Wacheski (who has written a how-to), and the current deployment officer is Alex Jansen. The project is produced by Jim […]
I’ve created a slideshare of my experience taking a 1981 Taito cabinet and making a MAME machine.